Friday, December 23, 2011

Best Dang Breakfast Ever~ Santa Fe Crescent Ring

Hey everyone! I have the best darn breakfast recipe to share with you, and you will be thanking me for years to come. I am sharing this recipe just in time for Christmas so that you can wow your friends and family Christmas morning. It is called the Santa Fe Crescent Ring, and it is as close to Heaven as you can come without... well... you know. Anyhow, I found 2 fabulous blogs that featured similar recipes for the crescent ring that I combined and, of course, tweeked to put a healthy, low- fat spin on it. Thank you, Bacon Time with the Hungry Hungry Hypo and Steelmom, for your inspiration for this recipe that was a major hit in my home!

Here's what ya need:
  • 10 egg whites (Remember whenever substituting egg whites for eggs, 2 egg whites = 1 egg)
  • 1 cup of any fat free or reduced fat Mexican blend shredded cheese
  • 1 8oz package of reduced fat crescent rolls (I always get the store brand)
  • 5 slices of Oscar Mayer Fully Cooked Bacon, which I pull all the funky fat off of.
  • 2 slices of tukey breast. Now, we always buy Boar's Head Ovengold turkey from the deli counter and have it sliced sandwich style.
  • 1/3 of a 10oz container of Philadelphia Cooking Creme- Santa Fe Blend. When I reduced Steelmom's recipe, it equaled 1/2 of the container, which I used the first time I made the ring, but it was waaay too rich for my liking. Since you will have leftover cooking creme, you can go the the Philadephia page I linked and use the rest in one of their recipes. 

Now here's what ya do:
  • Preheat your oven to 375 F degrees
  • Scramble up your egg whites on med heat. I always mix my egg whites with about 2 tbs skim milk.
  • While your eggs are cooking, break up the bacon and turkey into little chunks.
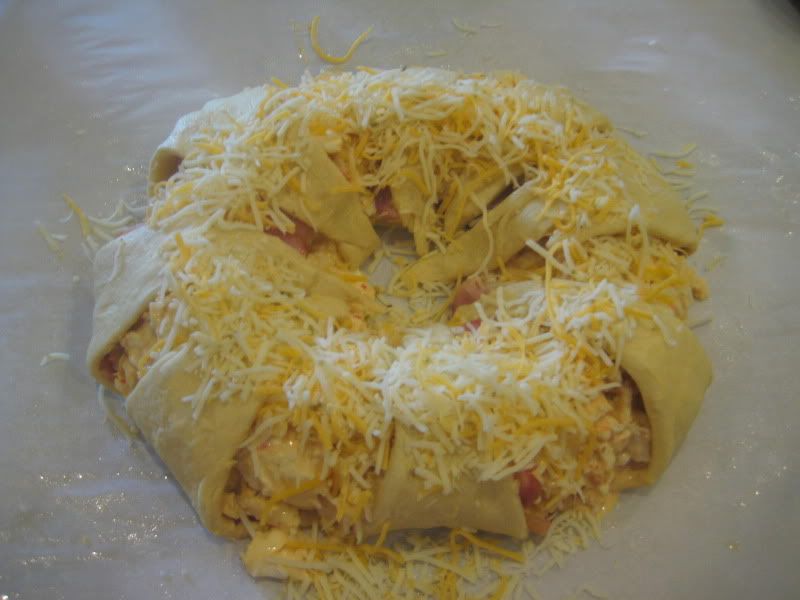
  • Put parchment paper on a large cookie sheet and spray parchment paper with non- stick cooking spray. Pull the crescent rolls apart so they are in triangles. Place rolls on parchment paper in a circle so that the points are sticking out and it looks like a sun. The flat parts should overlap a little. I always stretch the crescents out a bit so that they are a little longer than how they come out of the container. Sprinkle 1/3 cup of the shredded cheese around the wide end of the crescent rolls.
  • Once your eggs are done cooking, stir in the turkey, bacon and the Santa Fe Cooking Creme. Mix well.
  • Spoon the egg mixture onto the wide end of the rolls and put 1/3 cup cheese on top of the mixture.
  • Fold the points over the egg mixture and put the remaining cheese on top of the cresent ring.


  • Bake for about 15 minutes, or until the cheese on top is melted and the cresents are a golden brown.
  • Pull that baby out of the oven and enjoy the party in your mouth!


This serves 4 and take about 15 mintutes to prepare, plus your cooking time. You're going to fool everyone into thinking they're having a comfort meal, but you know the real truth. And seriously, if this doesn't make you want to slap your mama, I don't know what will!

Hope you all love this recipe and have a very, very Merry Christmas and happy holidays!!

Much Love,

Wednesday, December 21, 2011

Work It Wednesday

Goooood morning! How are y'all after the 7 Day Run Challenge? Motivated and feeling great, I hope!! Did you keep to your goal? Please share all successes!

I am well aware that the biggest holiday of the year is in 4 very short days, so I am going to make all 5 days of our workout short and sweet. Just like me!

Day 1:
Walking Lunges (Remember, these are essential if you want an amazing money maker, and who doesn't?) Read below to my post titled "Five Days of Hurting so Good" if you want some background on this exercise. This workout will take you 20 minutes to complete and music is vital. I recommend a mix from Rock My Run. You will be pissed at me and you will hate me during the first set, but it gets easier as you go.
50 lunges, rest 60 seconds
40 lunges, rest 60 seconds
30 lunges, rest 60 seconds
20 lunges, rest 60 seconds
10 lunges, rest 60 seconds

Day 2:
Run at least 1.5 miles or walk at least 2 miles. This exercise should take you no longer than 15 minutes if you're running or 30- 45 minutes if you're walking. I'm suggesting a run on day 2 because your butt and legs will feel horrible from your lunges on day 3.

Day 3:
Today we are doing a push up workout that will be 3 sets long with 3 exercises in each set. Now pay attention, because they will each be a little different. This should take you 20 minutes.
Set 1- 20 regular or knee push ups, 20 pike push ups & 20 tricep dips (I use my kitchen table chair)
-No rest, people- keep moving...
Set 2- 15 of each of the above.
-Keep on going- Almost done...
Set 3- 10 of each of the above.
Hallelujah you're done with day 3!
*ps If you're wondering wth a pike push up is, picture this: you have both hands and feet on the ground like a regular push up with your butt straight up in the air so you look like a big A. HAHA! Get it? Bend your elbows and lower your head to the ground, keeping your legs straight the entire time.

Day 4:
Squats~ I began doing this workout when my ankle was broken, so I was only squatting half way down. That is a good starting point if you're not used to doing squats. To begin this exercise, see how many squats you can do in a row to failure. When you figure out that number, repeat 9 more times with a 60 second rest in between each set. If you want to get crazy, do abs during your rest period. Try to do a minimum of 200 squats for your whole workout. This should take about 30 minutes to complete.
*Remember when doing a squat, keep feet shoulder width apart and don't let your knees go forward past your toes.

Day 5:
Do at least 30 minutes of some type of cardio. That could be hiking, running, hot yoga, etc. as long as you keep your heart rate high.

PLEASE leave comments on this post or message with any questions or comments. I want to hear how you're doing and if you want clarification on anything.


Merry Christmas if I don't talk to you before then. I hope you all have a happy and healthy holiday.

{FUN FACT} Did you know...
Exercise boosts brain power, melts stress away, gives you energy, helps ward off disease, pumps up your heart and increases your libido.


Monday, December 19, 2011

Christmas Crafting~ Ornament Chandelier

Hey everyone and thanks for visiting me today! Do y'all ever do this~ 1. Every year around Christmas time I get all these grand ideas for Christmas crafts. 2. I go to the craft store and am shell shocked by the price of seasonal crafting supplies. 3. I go home, sad and disappointed, like a little kid who didn't get everything on his/her Christmas list, and I promise myself I will buy up all these supplies at a 75% off discount so I can do my crafts the following year. 4. THAT HAS NEVER HAPPENED. Usually a couple weeks into January I remember my awesome idea to raid the clearance section, and that is well after the organized women with good memories have bought up all the good stuff!

This year I decided to bite the bullet (not literally thank goodness) and make a craft before Christmas. This was a great craft for a few reasons. 1. I was able to have craft time with my childhood friend, Kara, from Mine for the Making, and 2. if you visit her blog you will see how amazing she is and why I was so lucky to craft with her. 3. We got to watch our kids play together, which was so funny at times we were almost in tears from laughing!

My adorable craft was an ornament chandelier. I saw this idea on Pinterest (where else!) and it was originally posted from Bower Power. I chose to make this decoration because it looks stunning, but is so easy and inexpensive to make. It is pretty for Christmas and festive for New Year's. For my chandelier, I used 21 ornament balls and less than 1 roll of 9ft ribbon. You may want to use more or less of each depending on your ceiling height and how close the chandelier will be to your table, if it is hanging over a table. I bought 2 sets of shatterproof ornaments in small and large size from Walmart. They were each $4.95. The ones that have the design on them are glass and were $6 from Target. Since I only used half of the ornaments from each set from Walmart and I already had the ribbon, I say this chandelier cost me $10.95.

Here's how I made mine:
  • Cut 4 pieces of ribbon. The first piece being 19in., the second piece 16in., the third piece 13in., and the fourth piece 9in. These can be longer or shorter depending on how long you want yours.
  • Fold each ribbon in half and slide the ornaments down one side of the ribbon. 
  • I don't know that it matters, but I alternated the big and small ornaments and started with 4 ornaments on each ribbon. 
  • Then, I held the ribbons up all together to see how they looked and I added a few more ornaments wherever there were naked spots.
  • When I was satisfied with the way it looked, I tied each ribbon to my light fixture.


  • Creating this beautiful little decoration: 


 The best part about this project is that you can do any style or color ornament to match your holiday decor. In fact, as soon as I put mine up I decided I'm going to take it back down and add red ornaments. Well, I will take it down after New Year's and add the red ornaments in time for next Christmas!

Thank you, Kara, for hosting our wonderful craft day and helping me!

Merry Christmas, Party People!!

{FUN FACT} DID YOU KNOW...
Research suggests that decorations on a home's exterior make other people think you're more sociable and perhaps more integrated with the community and with its social activities.

Sunday, December 18, 2011

Supper Sunday- Pot Roast

Every Sunday we try to have a hearty, delicious home- cooked meal; hence Supper Sunday. This may be one of the few dinners during the week that I enforce the "if you don't eat what I cooked, you eat nothing at all" rule to Luke, since I know he would actually love it- if he would just take a freaking bite and try it!! Also, I LOVE doing a meal one night that I can turn into leftovers and completely different meals for the next couple of nights to come. My mom calls it frugal. I call it smart ;)

The recipe I am going to share with you for tonight's dinner is what I think of as a classic pot roast.  From the time it begins to cook, the roast makes the entire house smell so delicious. I'll make a roast year round, but nothing is better than cooking one during the winter when you can hang around the house in comfy clothes and enjoy the wonderful smell all day.


This is the way that my mom has prepared a roast for us for as long as I can remember, and it's the only way I cook one now. Not only is it beautiful, but it is sooo good and equally as easy. My mom has always done hers in the oven, but for some reason, I prefer to cook my roast in the crock pot.

Ingredients:
3- 4lb boneless pot roast- You can pick whichever cut you prefer the most based on tenderness, juiciness, etc., but I usually get a chuck roast or eye of round roast... Depending on what my local grocery store has on sale.
1 packet of Lipton Recipe Secrets Onion Soup & Dip Mix
4 large carrots- peeled & cut into rectangular pieces
4 large regular or red skinned potatoes- I skin the regular potatoes, but only clean the red skin potatoes, and quarter them both

Directions:
Put the roast in the crock pot and evenly cover the roast with the Lipton Soup Mix
Add water half way up the sides of the roast
Add potatoes and carrots around sides of the roast
Cover and cook on high for 4- 5 hours. If your dinner will be cooking all day while you're gone, set your crock pot on the low setting. The idea is that the roast is done cooking when it reaches 160ish degrees, so you can just set your crock pot on warm after the roast reached that temperature.
If the veggies aren't tender and cooked all the way by the time the roast is done, I put the veggies and the broth from the roast in a pan on the stove top and boil them for about 10 minutes. My mom would definitely use the broth to make a gravy, and serve over white bread and the veggies, but we nix the gravy in the name of staying healthy.

ps: Here is a dirty, embarrassing little secret- I dip my roast in ketchup (shriek!) because it adds the perfect twang. Mmmm!


Leftovers:
My absolute favorite part of making a roast are the next few lunches and dinners that follow. All you do is cut your left over roast so that it is shredded or into chunks and put it on your bread and *voila* you have delicious roast beef sandwiches! You can use mayo, lettuce, tomatoes, mustard, cheese, heat it up or eat it cold. Your options are endless!

Thank you for spending part of your Sunday with me. From my kitchen to yours, I hope you love this meal as much as I do :)  

{FUN FACT} Did you know...
Leftover Snickers bars from Halloween make a delicious dessert. Simply chop them up in the food processor. Peel, core and slice a few apples. Put the apples in a baking dish and sprinkle the chopped candy bars over the apples. Bake at 350 for 15 minutes. Serve alone with vanilla ice cream. Yum!!!


Thursday, December 15, 2011

Work It Wednesday

(a day late:))

Get those running shoes out and dusted off and a good run mix on your Ipod because you will be needing them this week! After a motivating conversation with my sweet childhood friend, Renuka, I decided to try something different this week... Rather than 5 days of cardio & weight training, I challenge you to run at least 1 mile per day for 7 days. Wait. Whaaaaa?? I know you have work, school or you might be on vacation, but this takes up so little of your time (10ish minutes) and you will be so happy you did it.


I used to despise running more than anyone up until earlier this year. After I broke my ankle, and was unable to exercise, I learned I was taking my perfectly working and healthy body for granted. I realized I owe it to myself to make running a habit. Not only for weight loss and staying fit benefits, but also for the long list (don't ask my husband about this list if you have anywhere to be) of benefits we don't see. Keeping our sweet little hearts healthy and strong being number 1 on that list.  

Let's face it- we are all more busy than usual right now during the holidays, and we may not be sticking to our workout & eating well regime like we promised ourselves we would. I know you've thought in your head that this year will be different- you're not going to eat as much, you won't drink as much wine and you will workout more. Don't tell me I'm alone here, people! It is SO important to squeeze in a little workout at least 4 days a week. I am giving you this 7 day challenge because I just did it and I lost 4lbs!! You may not lose 4lbs, but even if you shave seconds off your time, that is an accomplishment.

As always, good luck and have fun and I can't wait to hear your results! Ladies and Gentlemen, start your engines!!


Site Design by Designer Blogs